Nginx 的扩展-OpenRestry
课程目标
Nginx 进程模型简介
Nginx 的高可用方案
OpenResty 安装及使用
什么是 API 网关?
OpenResty 实现灰度发布功能
Nginx 进程模型简介
多进程
Tomcat
- BIO
- NIO
- AIO
Nginx
- 多进程+多路复用
- master 进程 、 worker 进程
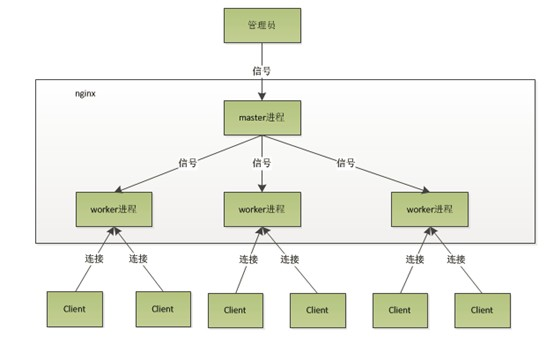
当它启动以后,会产生一个主进程和多个工作进程,多个工作进程是通过 Master 进程去管理的。它是基于 Master 进程 Fork 出来的。当我们的 Nginx 收到一个请求的时候,它会向我们的 work 发送一个信号。然后通过 worker 进程去管理。类似于中心进程的意思。
当有一个请求过来的时候,只会有一个 worker 进程去处理。
| root /nginx | 7473 | 1 | 0 20:09 | ? | 00:00:00 nginx: | master process . |
|---|---|---|---|---|---|---|
| nobody | 7474 | 7473 | 0 20:09 | ? | 00:00:00 nginx: | worker process |
[root@Darian1 nginx]# ps -ef|grep nginx
root      47432      1  0 00:14 ?        00:00:00 nginx: master process ./sbin/nginx
nobody    47433  47432  0 00:14 ?        00:00:00 nginx: worker process
root      47438  47405  0 00:14 pts/1    00:00:00 grep --color=auto nginx
[root@Darian1 nginx]#
[root@Darian1 nginx]# ps -ef|grep nginx
root 47432 1 0 00:14 ? 00:00:00 nginx: master process ./sbin/nginx
nobody 47433 47432 0 00:14 ? 00:00:00 nginx: worker process
root 47438 47405 0 00:14 pts/1 00:00:00 grep --color=auto nginx
[root@Darian1 nginx]#2
3
4
5
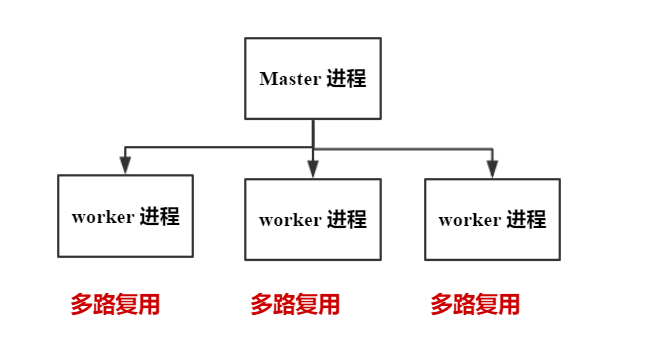
Master 进程会去管理每一个 worker 进程。当客户端发起一个请求的时候,它会由 worker 进程去处理,而不是由 Master 进程去处理。如果有多个 worker 进程的时候,一个请求过来,它会有一个竞争。每一个进程会去争抢获得这样的一个许可。
相当于多个 worker 进程 组成一个集群去实现,每一个 worker 进程后边是多路复用。
Nginx 配置几个进程
工作进程建议设置成我们的 CPU 总核心数。
IO模型
- epoll . select ....
Linux 理论上最大的连接数是 6535 。
最后支持的就是 CPU 数 * 进程数 。
# 用户组,这个用户组是当前 Linux 的用户组。和用户账号
#user  nobody;
# Nginx 工作进程数, 建议设置成我们的 CPU 总核心数。
worker_processes  1;

#error_log  logs/error.log;
#error_log  logs/error.log  notice;
#error_log  logs/error.log  info;

#pid        logs/nginx.pid;

events {
    # io 模型
    use epoll ;
    # 理论上  processes* connections
    worker_connections  1024;
}
# 用户组,这个用户组是当前 Linux 的用户组。和用户账号
#user nobody;
# Nginx 工作进程数, 建议设置成我们的 CPU 总核心数。
worker_processes 1;
#error_log logs/error.log;
#error_log logs/error.log notice;
#error_log logs/error.log info;
#pid logs/nginx.pid;
events {
# io 模型
use epoll ;
# 理论上 processes* connections
worker_connections 1024;
}2
3
4
5
6
7
8
9
10
11
12
13
14
15
16
17
#user  nobody;
worker_processes  1;

#error_log  logs/error.log;
#error_log  logs/error.log  notice;
#error_log  logs/error.log  info;

#pid        logs/nginx.pid;

events {
    worker_connections  1024;
}

http {
    # 媒体类型,
    include       mime.types;
    # 默认的配置是二进制字节流
    default_type  application/octet-stream;
    # 日志格式,命名,把日志放到某一个文件里边,然后用 Kafka 收集起来,最后做分析
    log_format  main  '$remote_addr - $remote_user [$time_local] "$request" '
        '$status $body_bytes_sent "$http_referer" '
        '"$http_user_agent" "$http_x_forwarded_for"';
    # 访问日志,每一个请求都会记录一个日志
    #access_log  logs/access.log  main;
    # 是否开启 0 拷贝模式,我们传输文件 0 拷贝效率高
    sendfile        on;
    # tcp 超时时间
    #tcp_nopush     on;

    #keepalive_timeout  0;
    keepalive_timeout  65;

    # 扫描这个目录下的配置文件
    include    extra/*.conf;

    # 是否打开 gzip
    gzip on;
    # 超过多长长度再进行压缩
    gzip_min_length 5K;
    # 压缩的等级越高,压缩后的文件越小,占用的 CPU 越高
    gzip_comp_level 3;
    # 对哪些文件去做压缩
    gzip_types application/javascript image/jpeg;
    # 设置缓冲区,按照我们我们指定大小的倍数去申请内存,
    # 按照我们原始文件的大小,以 32K 为单位的四倍去申请内存。
    gzip_buffers 4 32k;
    # 是否传输 “vary: Accept-Encoding” 的文件头标志
    # 根据客户端的头去判断我们是不是要去做压缩。
    gzip_vary on;
}
#user  nobody;
worker_processes  1;

#error_log  logs/error.log;
#error_log  logs/error.log  notice;
#error_log  logs/error.log  info;

#pid        logs/nginx.pid;

events {
    worker_connections  1024;
}

http {
    # 媒体类型,
    include       mime.types;
    # 默认的配置是二进制字节流
    default_type  application/octet-stream;
    # 日志格式,命名,把日志放到某一个文件里边,然后用 Kafka 收集起来,最后做分析
    log_format  main  '$remote_addr - $remote_user [$time_local] "$request" '
        '$status $body_bytes_sent "$http_referer" '
        '"$http_user_agent" "$http_x_forwarded_for"';
    # 访问日志,每一个请求都会记录一个日志
    #access_log  logs/access.log  main;
    # 是否开启 0 拷贝模式,我们传输文件 0 拷贝效率高
    sendfile        on;
    # tcp 超时时间
    #tcp_nopush     on;

    #keepalive_timeout  0;
    keepalive_timeout  65;

    # 扫描这个目录下的配置文件
    include    extra/*.conf;

    # 是否打开 gzip
    gzip on;
    # 超过多长长度再进行压缩
    gzip_min_length 5K;
    # 压缩的等级越高,压缩后的文件越小,占用的 CPU 越高
    gzip_comp_level 3;
    # 对哪些文件去做压缩
    gzip_types application/javascript image/jpeg;
    # 设置缓冲区,按照我们我们指定大小的倍数去申请内存,
    # 按照我们原始文件的大小,以 32K 为单位的四倍去申请内存。
    gzip_buffers 4 32k;
    # 是否传输 “vary: Accept-Encoding” 的文件头标志
    # 根据客户端的头去判断我们是不是要去做压缩。
    gzip_vary on;
}2
3
4
5
6
7
8
9
10
11
12
13
14
15
16
17
18
19
20
21
22
23
24
25
26
27
28
29
30
31
32
33
34
35
36
37
38
39
40
41
42
43
44
45
46
47
48
49
50
51
Nginx 的高可用方案
 、
、
这模型它的整个吞吐量是有限的。一旦大了以后,就会崩溃
Nginx 作为反向代理服务器,所有的流量都会经过 Nginx,所以 Nginx 本身的可靠性是我们首先要考虑的问题。
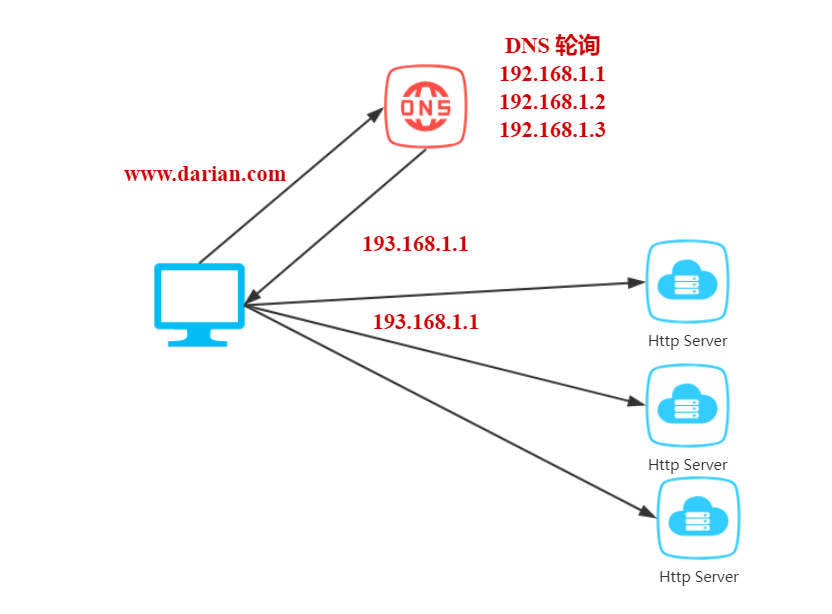
问题: HTTP Server 之间的同步,出现问题的切换,DNS 是没有办法的。
通过 Nginx 去代理后端应用的服务器。Nginx 对外是一个 IP 地址,七层负载,做一个转发,用过 应用层的 URI 做一些转发。 我可以做 IP_Hash 、轮询、权重 ... ... 各种方式去做转发。
Nginx 性能比 Tomcat 高的多得多。高性能的反向代理服务器。(DNS 是对域名做解析的。)通过 Nginx 做一个集群。
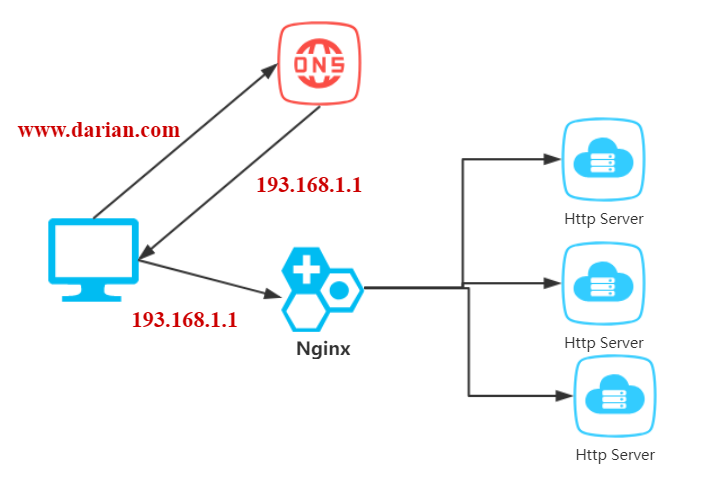
我们为了避免单点故障,会对 Nginx 的单点问题!!!
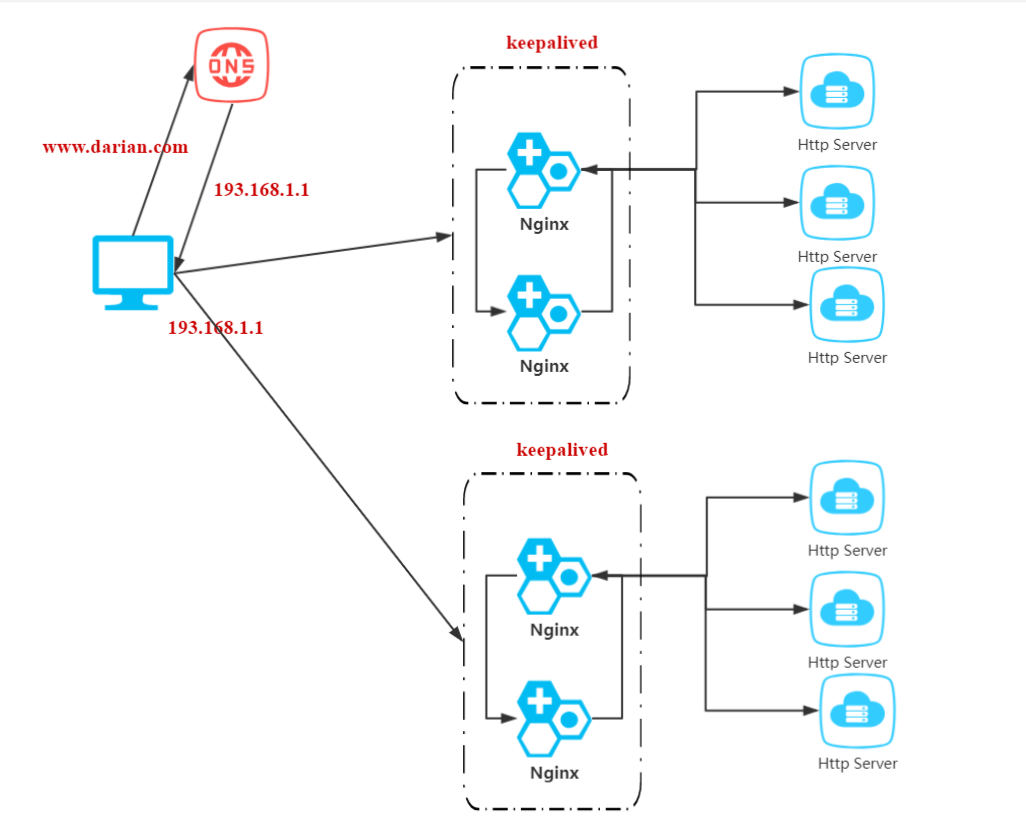
我一个请求过来,会根据它的一个 IP + 端口号 做一个转发,转发以后,后续请求,不是通过 F5 去做一个返回。而是直接返回,知识通过 F5 做一个解析而已。 F5 的性能比 Nginx 是更高的。

流量问题,不能纯靠技术问题去解决。
www.baidu.com 它是可以分发到不同的站点的,叫做 地域服务器 。
在北京访问北京的机房,其它的地方,访问其它地方的机房。
流量是无限的。我们需要通过 多机房,地域来解析。
把你的请求转发到离你最近的服务器上。
keepalived
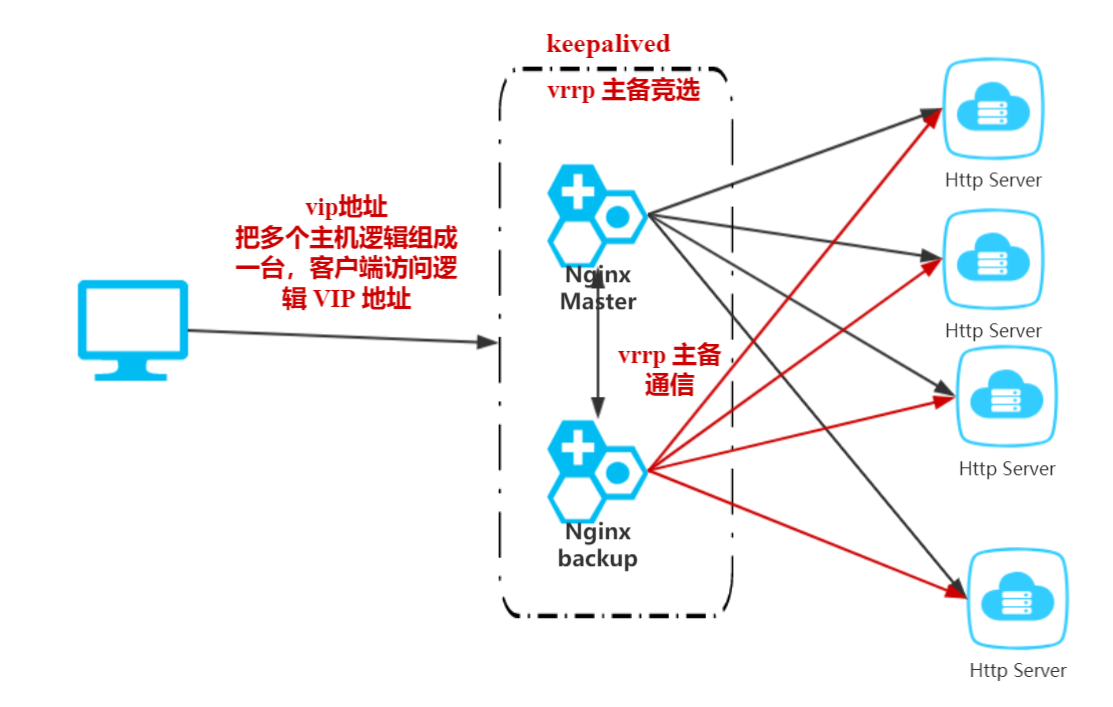
keeppalived 可以生成 虚拟IP ( vip )。
Keepalived 是 Linux 下一个轻量级别的高可用解决方案,Keepalived 软件起初是专为 LVS 负载均衡软件 设计的,用来管理并监控 LVS 集群系统中各个服务节点的状态,后来又加入了可以实现高可用的 VRRP 功能。因此,Keepalived 除了能够管理 LVS 软件外,还可以作为其他服务(例如:Nginx、Haproxy、MySQL 等)的高可用解决方案软件。
Keepalived 软件主要是通过 VRRP 协议实现高可用功能的。VRRP 是 Virtual Router RedundancyProtocol (虚拟路由器冗余协议)的缩写,VRRP 出现的目的就是为了解决静态路由单点故障问题的,它能够保证当个别节点宕机时,整个网络可以不间断地运行;(简单来说,vrrp 就是把两台或多态路由器设备虚拟成一个设备, 实现主备高可用)。(它是虚拟 IP )
所以,Keepalived 一方面具有配置管理 LVS 的功能,同时还具有对 LVS 下面节点进行健康检查的功能,另一方面也可实现系统网络服务的高可用功能。
LVS 是 Linux Virtual Server 的缩写,也就是 Linux 虚拟服务器,在 linux2.4 内核以后,已经完全内置了 LVS 的各个功能模块。
它是工作在四层的负载均衡,类似于 Haproxy, 主要用于实现对服务器集群的负载均衡。
关于四层负载,我们知道 osi 网络层次模型的 7 层模模型(应用层、表示层、会话层、传输层、网络层、数据链路层、物理层);四层负载就是基于传输层,也就是 ip+端口 的负载;而七层负载就是需要基于 URL 等应用层的信息来做负载,同时还有二层负载(基于 MAC)、三层负载(IP);
常见的四层负载有:LVS、F5 ; 七层负载有 : Nginx、HAproxy ; 在软件层面,
Nginx / LVS / HAProxy 是使用得比较广泛的三种负载均衡软件
对于中小型的 Web 应用,可以使用 Nginx、大型网站或者重要的服务并且服务比较多的时候,可以考虑使用 LVS
轻量级的高可用解决方案
LVS 四层负载均衡软件(Linux virtual server) 监控 lvs 集群系统中的各个服务节点的状态VRRP 协议(虚拟路由冗余协议) linux2.4 以后,是内置在 linux 内核中的
lvs(四层) -> HAproxy 七层
lvs(四层) -> Nginx(七层)
实践
下载 keepalived 的安装包
tar -zxvf keepalived-2.0.7.tar.gz在
/data/program/目录下创建一个 keepalived 的文件cd 到 keepalived-2.0.7 目录下,执行
./configure -- prefix=/data/program/keepalived --sysconf=/etc如果缺少依赖库,则
yum install gcc;yum install openssl-devel ;yum install libnl libnl-devel编译安装
make && make install进入安装后的路径
cd /data/program/keepalived, 创建软连接:ln -s sbin/keepalived /sbincp /data/program/keepalived-2.0.7/keepalived/etc/init.d/keepalived /etc/init.d把运行的的服务添加进去
chkconfig --add keepalivedchkconfig keepalived onservice keepalived start
安装步骤
版本,2.0.7 其他版本会有问题。
c[root@Darian1 software]# tar -zxvf keepalived-2.0.11.tar.gz [root@Darian1 software]# mkdir keepalived [root@Darian1 software]# cd keepalived-2.0.11/ [root@Darian1 keepalived-2.0.11]# ./configure --prefix=/software/keepalived --sysconf=/etc configure: error: !!! OpenSSL is not properly installed on your system. !!! !!! Can not include OpenSSL headers files. !!! [root@Darian1 keepalived-2.0.11]# yum install openssl-devel Is this ok [y/d/N]: y *** WARNING - this build will not support IPVS with IPv6. Please install libnl/libnl-3 dev libraries to support IPv6 with IPVS. [root@Darian1 keepalived-2.0.11]# yum install libnl libnl-devel [root@Darian1 keepalived-2.0.11]# yum install gcc [root@Darian1 keepalived-2.0.11]# ./configure --prefix=/software/keepalived --sysconf=/etc configure: error: libnfnetlink headers missing [root@Darian3 keepalived-2.0.7]# yum install -y libnfnetlink-devel [root@Darian1 keepalived-2.0.7]# make && make install [root@Darian3 software]# mkdir keepalived [root@Darian1 keepalived]# cd ../keepalived [root@Darian1 keepalived]# ln -s sbin/keepalived /sbin [root@Darian1 keepalived]# cp /software/keepalived-2.0.7/keepalived/etc/init.d/keepalived /etc/init.d [root@Darian1 keepalived]# chkconfig --add keepalived [root@Darian1 keepalived]# chkconfig keepalived on 注意:正在将请求转发到“systemctl enable keepalived.service”。 Created symlink from /etc/systemd/system/multi-user.target.wants/keepalived.service to /usr/lib/systemd/system/keepalived.service. [root@Darian1 keepalived]# service keepalived start [root@Darian1 keepalived]# service keepalived status[root@Darian1 software]# tar -zxvf keepalived-2.0.11.tar.gz [root@Darian1 software]# mkdir keepalived [root@Darian1 software]# cd keepalived-2.0.11/ [root@Darian1 keepalived-2.0.11]# ./configure --prefix=/software/keepalived --sysconf=/etc configure: error: !!! OpenSSL is not properly installed on your system. !!! !!! Can not include OpenSSL headers files. !!! [root@Darian1 keepalived-2.0.11]# yum install openssl-devel Is this ok [y/d/N]: y *** WARNING - this build will not support IPVS with IPv6. Please install libnl/libnl-3 dev libraries to support IPv6 with IPVS. [root@Darian1 keepalived-2.0.11]# yum install libnl libnl-devel [root@Darian1 keepalived-2.0.11]# yum install gcc [root@Darian1 keepalived-2.0.11]# ./configure --prefix=/software/keepalived --sysconf=/etc configure: error: libnfnetlink headers missing [root@Darian3 keepalived-2.0.7]# yum install -y libnfnetlink-devel [root@Darian1 keepalived-2.0.7]# make && make install [root@Darian3 software]# mkdir keepalived [root@Darian1 keepalived]# cd ../keepalived [root@Darian1 keepalived]# ln -s sbin/keepalived /sbin [root@Darian1 keepalived]# cp /software/keepalived-2.0.7/keepalived/etc/init.d/keepalived /etc/init.d [root@Darian1 keepalived]# chkconfig --add keepalived [root@Darian1 keepalived]# chkconfig keepalived on 注意:正在将请求转发到“systemctl enable keepalived.service”。 Created symlink from /etc/systemd/system/multi-user.target.wants/keepalived.service to /usr/lib/systemd/system/keepalived.service. [root@Darian1 keepalived]# service keepalived start [root@Darian1 keepalived]# service keepalived status1
2
3
4
5
6
7
8
9
10
11
12
13
14
15
16
17
18
19
20
21
22
23
24
25
26
27
28
29
30
31
32
33
34
35
请立马配置 keepalived 的日志
keepalived 的配置
[root@Darian1 keepalived]# vim /etc/keepalived/keepalived.conf

! Configuration File for keepalived

# 配置一些全局的东西
global_defs {
   # 邮箱的配置, 当 keepalived 发生错误的时候,发送到你的邮箱里边
   notification_email {
     [email protected]
     [email protected]
     [email protected]
   }
   notification_email_from [email protected]
   smtp_server 192.168.200.1
   smtp_connect_timeout 30
   router_id LVS_DEVEL
   vrrp_skip_check_adv_addr
   vrrp_strict
   vrrp_garp_interval 0
   vrrp_gna_interval 0
}

# 虚拟的路由的冗余协议
vrrp_instance VI_1 {
    state MASTER
    interface eth0
    virtual_router_id 51
    priority 100
    advert_int 1
    authentication {
        auth_type PASS
        auth_pass 1111
    }
    # 配置多个虚拟 IP 地址
    virtual_ipaddress {
        192.168.200.16
        192.168.200.17
        192.168.200.18
    }
}

# 虚拟的服务,就是我们的 LVS  了,就是我们对外的一个虚拟的 IP 地址的配置的映射,默认 443 是对 HTTPS 的一个映射,
virtual_server 192.168.200.100 443 {
    delay_loop 6
    lb_algo rr
    lb_kind NAT
    persistence_timeout 50
    protocol TCP

    # 这里是真实服务的一个配置
    real_server 192.168.201.100 443 {
        weight 1
        SSL_GET {
            url {
              path /
              digest ff20ad2481f97b1754ef3e12ecd3a9cc
            }
            url {
              path /mrtg/
              digest 9b3a0c85a887a256d6939da88aabd8cd
            }
            connect_timeout 3
            retry 3
            delay_before_retry 3
        }
    }
}

virtual_server 10.10.10.2 1358 {
    delay_loop 6
    lb_algo rr
    lb_kind NAT
    persistence_timeout 50
    protocol TCP

    sorry_server 192.168.200.200 1358

    real_server 192.168.200.2 1358 {
        weight 1
        HTTP_GET {
            url {
              path /testurl/test.jsp
              digest 640205b7b0fc66c1ea91c463fac6334d
            }
            url {
              path /testurl2/test.jsp
              digest 640205b7b0fc66c1ea91c463fac6334d
            }
            url {
              path /testurl3/test.jsp
              digest 640205b7b0fc66c1ea91c463fac6334d
            }
            connect_timeout 3
            retry 3
            delay_before_retry 3
        }
    }

    real_server 192.168.200.3 1358 {
        weight 1
        HTTP_GET {
            url {
              path /testurl/test.jsp
              digest 640205b7b0fc66c1ea91c463fac6334c
            }
            url {
              path /testurl2/test.jsp
              digest 640205b7b0fc66c1ea91c463fac6334c
            }
            connect_timeout 3
            retry 3
            delay_before_retry 3
        }
    }
}

virtual_server 10.10.10.3 1358 {
    delay_loop 3
    lb_algo rr
    lb_kind NAT
    persistence_timeout 50
    protocol TCP

    real_server 192.168.200.4 1358 {
        weight 1
        HTTP_GET {
            url {
              path /testurl/test.jsp
              digest 640205b7b0fc66c1ea91c463fac6334d
            }
            url {
              path /testurl2/test.jsp
              digest 640205b7b0fc66c1ea91c463fac6334d
            }
            url {
              path /testurl3/test.jsp
              digest 640205b7b0fc66c1ea91c463fac6334d
            }
            connect_timeout 3
            retry 3
            delay_before_retry 3
        }
    }

    real_server 192.168.200.5 1358 {
        weight 1
        HTTP_GET {
            url {
              path /testurl/test.jsp
              digest 640205b7b0fc66c1ea91c463fac6334d
            }
            url {
              path /testurl2/test.jsp
              digest 640205b7b0fc66c1ea91c463fac6334d
            }
            url {
              path /testurl3/test.jsp
              digest 640205b7b0fc66c1ea91c463fac6334d
            }
            connect_timeout 3
            retry 3
            delay_before_retry 3
        }
    }
[root@Darian1 keepalived]# vim /etc/keepalived/keepalived.conf
! Configuration File for keepalived
# 配置一些全局的东西
global_defs {
# 邮箱的配置, 当 keepalived 发生错误的时候,发送到你的邮箱里边
notification_email {
[email protected]
[email protected]
[email protected]
}
notification_email_from [email protected]
smtp_server 192.168.200.1
smtp_connect_timeout 30
router_id LVS_DEVEL
vrrp_skip_check_adv_addr
vrrp_strict
vrrp_garp_interval 0
vrrp_gna_interval 0
}
# 虚拟的路由的冗余协议
vrrp_instance VI_1 {
state MASTER
interface eth0
virtual_router_id 51
priority 100
advert_int 1
authentication {
auth_type PASS
auth_pass 1111
}
# 配置多个虚拟 IP 地址
virtual_ipaddress {
192.168.200.16
192.168.200.17
192.168.200.18
}
}
# 虚拟的服务,就是我们的 LVS 了,就是我们对外的一个虚拟的 IP 地址的配置的映射,默认 443 是对 HTTPS 的一个映射,
virtual_server 192.168.200.100 443 {
delay_loop 6
lb_algo rr
lb_kind NAT
persistence_timeout 50
protocol TCP
# 这里是真实服务的一个配置
real_server 192.168.201.100 443 {
weight 1
SSL_GET {
url {
path /
digest ff20ad2481f97b1754ef3e12ecd3a9cc
}
url {
path /mrtg/
digest 9b3a0c85a887a256d6939da88aabd8cd
}
connect_timeout 3
retry 3
delay_before_retry 3
}
}
}
virtual_server 10.10.10.2 1358 {
delay_loop 6
lb_algo rr
lb_kind NAT
persistence_timeout 50
protocol TCP
sorry_server 192.168.200.200 1358
real_server 192.168.200.2 1358 {
weight 1
HTTP_GET {
url {
path /testurl/test.jsp
digest 640205b7b0fc66c1ea91c463fac6334d
}
url {
path /testurl2/test.jsp
digest 640205b7b0fc66c1ea91c463fac6334d
}
url {
path /testurl3/test.jsp
digest 640205b7b0fc66c1ea91c463fac6334d
}
connect_timeout 3
retry 3
delay_before_retry 3
}
}
real_server 192.168.200.3 1358 {
weight 1
HTTP_GET {
url {
path /testurl/test.jsp
digest 640205b7b0fc66c1ea91c463fac6334c
}
url {
path /testurl2/test.jsp
digest 640205b7b0fc66c1ea91c463fac6334c
}
connect_timeout 3
retry 3
delay_before_retry 3
}
}
}
virtual_server 10.10.10.3 1358 {
delay_loop 3
lb_algo rr
lb_kind NAT
persistence_timeout 50
protocol TCP
real_server 192.168.200.4 1358 {
weight 1
HTTP_GET {
url {
path /testurl/test.jsp
digest 640205b7b0fc66c1ea91c463fac6334d
}
url {
path /testurl2/test.jsp
digest 640205b7b0fc66c1ea91c463fac6334d
}
url {
path /testurl3/test.jsp
digest 640205b7b0fc66c1ea91c463fac6334d
}
connect_timeout 3
retry 3
delay_before_retry 3
}
}
real_server 192.168.200.5 1358 {
weight 1
HTTP_GET {
url {
path /testurl/test.jsp
digest 640205b7b0fc66c1ea91c463fac6334d
}
url {
path /testurl2/test.jsp
digest 640205b7b0fc66c1ea91c463fac6334d
}
url {
path /testurl3/test.jsp
digest 640205b7b0fc66c1ea91c463fac6334d
}
connect_timeout 3
retry 3
delay_before_retry 3
}
}2
3
4
5
6
7
8
9
10
11
12
13
14
15
16
17
18
19
20
21
22
23
24
25
26
27
28
29
30
31
32
33
34
35
36
37
38
39
40
41
42
43
44
45
46
47
48
49
50
51
52
53
54
55
56
57
58
59
60
61
62
63
64
65
66
67
68
69
70
71
72
73
74
75
76
77
78
79
80
81
82
83
84
85
86
87
88
89
90
91
92
93
94
95
96
97
98
99
100
101
102
103
104
105
106
107
108
109
110
111
112
113
114
115
116
117
118
119
120
121
122
123
124
125
126
127
128
129
130
131
132
133
134
135
136
137
138
139
140
141
142
143
144
145
146
147
148
149
150
151
152
153
154
155
156
157
158
159
160
161
162
163
164
我们需要在 Keepalived 里边配置 Nginx 的一些东西。通过 Keepalived 实现了对 Nginx 的高可用,keepalived 是对 LVS 的一个检测。这个 虚拟 IP 会根据你的配置去进行映射。

master
[root@Darian1 keepalived]# vim /etc/keepalived/keepalived.conf

! Configuration File for keepalived

global_defs {
    # 运行 keepalived 服务器的标识,在一个网络内应该是唯一的
    router_id LVS_DEVEL
}

# vrrp 实例定义部分
vrrp_instance VI_1 {
    # 设置 lvs 的状态,MASTER 和 BACKUP 两种,必须大写
    state MASTER
    # 设置对外服务的接口,网卡的地址
    interface ens33
    # 设置虚拟路由标示,这个标示是一个数字,同一个 vr rp 实例使用唯一标示
    virtual_router_id 51
    # 定义优先级,数字越大优先级越高,在一个 vrrp——instance 下,master 的优先级必须大于 backup
    priority 100
    # 设定 master 与 backup 负载均衡器之间同步检查的时间间隔,单位是秒
    advert_int 1

    authentication {
        # 设置验证类型和密码
        auth_type PASS
        # 验证密码,同一个 vrrp_instance 下 MASTER 和 BACKUP 密码必须相同
        auth_pass 1111
    }

    virtual_ipaddress {
        #设置虚拟 ip 地址,可以设置多个,每行一个
        192.168.40.100
    }
}

# 设置虚拟服务器,需要指定虚拟 ip 和服务端口
virtual_server 192.168.40.100 80 {
    # 健康检查时间间隔
    delay_loop 6
    # 负载均衡调度算法
    lb_algo rr
    # 负载均衡转发规则
    lb_kind NAT
    # 设置会话保持时间protocol TCP #指定转发协议类型,有 TCP 和 UDP 两种
    persistence_timeout 50
    # 配置服务器节点 1,需要指定 real server 的真实 IP 地址和端口
    real_server 192.168.40.128 80 {
        # 设置权重,数字越大权重越高
        weight 1
        # realserver 的状态监测设置部分单位秒,用来去检测它的状态
        TCP_CHECK {
            # 超时时间
            connect_timeout 3
            # 重试间隔
            delay_before_retry 3
            # 监测端口
            connect_port 80
        }
    }
}
[root@Darian1 keepalived]# vim /etc/keepalived/keepalived.conf
! Configuration File for keepalived
global_defs {
# 运行 keepalived 服务器的标识,在一个网络内应该是唯一的
router_id LVS_DEVEL
}
# vrrp 实例定义部分
vrrp_instance VI_1 {
# 设置 lvs 的状态,MASTER 和 BACKUP 两种,必须大写
state MASTER
# 设置对外服务的接口,网卡的地址
interface ens33
# 设置虚拟路由标示,这个标示是一个数字,同一个 vr rp 实例使用唯一标示
virtual_router_id 51
# 定义优先级,数字越大优先级越高,在一个 vrrp——instance 下,master 的优先级必须大于 backup
priority 100
# 设定 master 与 backup 负载均衡器之间同步检查的时间间隔,单位是秒
advert_int 1
authentication {
# 设置验证类型和密码
auth_type PASS
# 验证密码,同一个 vrrp_instance 下 MASTER 和 BACKUP 密码必须相同
auth_pass 1111
}
virtual_ipaddress {
#设置虚拟 ip 地址,可以设置多个,每行一个
192.168.40.100
}
}
# 设置虚拟服务器,需要指定虚拟 ip 和服务端口
virtual_server 192.168.40.100 80 {
# 健康检查时间间隔
delay_loop 6
# 负载均衡调度算法
lb_algo rr
# 负载均衡转发规则
lb_kind NAT
# 设置会话保持时间protocol TCP #指定转发协议类型,有 TCP 和 UDP 两种
persistence_timeout 50
# 配置服务器节点 1,需要指定 real server 的真实 IP 地址和端口
real_server 192.168.40.128 80 {
# 设置权重,数字越大权重越高
weight 1
# realserver 的状态监测设置部分单位秒,用来去检测它的状态
TCP_CHECK {
# 超时时间
connect_timeout 3
# 重试间隔
delay_before_retry 3
# 监测端口
connect_port 80
}
}
}2
3
4
5
6
7
8
9
10
11
12
13
14
15
16
17
18
19
20
21
22
23
24
25
26
27
28
29
30
31
32
33
34
35
36
37
38
39
40
41
42
43
44
45
46
47
48
49
50
51
52
53
54
55
56
57
58
59
60
backup
vim /etc/keepalived/keepalived.conf
! Configuration File for keepalived

global_defs {
   router_id LVS_DEVEL
}

vrrp_instance VI_1 {
   state BACKUP
   interface ens33
   virtual_router_id 51
   priority 50
   advert_int 1
   authentication {
       auth_type PASS
       auth_pass 1111
   }
   virtual_ipaddress {
       192.168.40.100
   }
}

virtual_server 192.168.40.100 80 {
   delay_loop 6
   lb_algo rr
   lb_kind NAT
   persistence_timeout 50
   protocol TCP

   real_server 192.168.40.129 80 {
       weight 1
       TCP_CHECK {
           connect_timeout 3
           delay_before_retry 3
           connect_port 80
       }
   }
}
! Configuration File for keepalived
global_defs {
router_id LVS_DEVEL
}
vrrp_instance VI_1 {
state BACKUP
interface ens33
virtual_router_id 51
priority 50
advert_int 1
authentication {
auth_type PASS
auth_pass 1111
}
virtual_ipaddress {
192.168.40.100
}
}
virtual_server 192.168.40.100 80 {
delay_loop 6
lb_algo rr
lb_kind NAT
persistence_timeout 50
protocol TCP
real_server 192.168.40.129 80 {
weight 1
TCP_CHECK {
connect_timeout 3
delay_before_retry 3
connect_port 80
}
}
}2
3
4
5
6
7
8
9
10
11
12
13
14
15
16
17
18
19
20
21
22
23
24
25
26
27
28
29
30
31
32
33
34
35
36
37
[root@Darian1 software]# service keepalived restart
Restarting keepalived (via systemctl):                     [  确定  ]
[root@Darian1 software]# service keepalived status
● keepalived.service - LVS and VRRP High Availability Monitor
   Loaded: loaded (/usr/lib/systemd/system/keepalived.service; enabled; vendor preset: disabled)
   Active: active (running) since 日 2019-01-20 20:10:22 CST; 20s ago
  Process: 83210 ExecStart=/software/keepalived/sbin/keepalived $KEEPALIVED_OPTIONS (code=exited, status=0/SUCCESS)
 Main PID: 83211 (keepalived)
   CGroup: /system.slice/keepalived.service
           ├─83211 /software/keepalived/sbin/keepalived -D
           ├─83212 /software/keepalived/sbin/keepalived -D
           └─83213 /software/keepalived/sbin/keepalived -D

1月 20 20:10:25 Darian1 Keepalived_vrrp[83213]: Sending gratuitous ARP on ens33 for 192.168.11.100
1月 20 20:10:25 Darian1 Keepalived_vrrp[83213]: Sending gratuitous ARP on ens33 for 192.168.11.100
1月 20 20:10:25 Darian1 Keepalived_vrrp[83213]: Sending gratuitous ARP on ens33 for 192.168.11.100
1月 20 20:10:28 Darian1 Keepalived_healthcheckers[83212]: TCP connection to [192.168.40.128]:udp:80 success.
1月 20 20:10:30 Darian1 Keepalived_vrrp[83213]: Sending gratuitous ARP on ens33 for 192.168.11.100
1月 20 20:10:30 Darian1 Keepalived_vrrp[83213]: (VI_1) Sending/queueing gratuitous ARPs on ens33 for 192.168.11.100
1月 20 20:10:30 Darian1 Keepalived_vrrp[83213]: Sending gratuitous ARP on ens33 for 192.168.11.100
1月 20 20:10:30 Darian1 Keepalived_vrrp[83213]: Sending gratuitous ARP on ens33 for 192.168.11.100
1月 20 20:10:30 Darian1 Keepalived_vrrp[83213]: Sending gratuitous ARP on ens33 for 192.168.11.100
1月 20 20:10:30 Darian1 Keepalived_vrrp[83213]: Sending gratuitous ARP on ens33 for 192.168.11.100
[root@Darian1 software]#


[root@Darian3 software]# service keepalived restart
Restarting keepalived (via systemctl):                     [  确定  ]
[root@Darian3 software]#  service keepalived status
● keepalived.service - LVS and VRRP High Availability Monitor
   Loaded: loaded (/usr/lib/systemd/system/keepalived.service; enabled; vendor preset: disabled)
   Active: active (running) since 日 2019-01-20 20:12:31 CST; 15s ago
  Process: 47254 ExecStart=/software/keepalived/sbin/keepalived $KEEPALIVED_OPTIONS (code=exited, status=0/SUCCESS)
 Main PID: 47255 (keepalived)
   CGroup: /system.slice/keepalived.service
           ├─47255 /software/keepalived/sbin/keepalived -D
           ├─47256 /software/keepalived/sbin/keepalived -D
           └─47257 /software/keepalived/sbin/keepalived -D

1月 20 20:12:31 Darian3 Keepalived_vrrp[47257]: (Line 3) Unexpected '{' - ignoring
1月 20 20:12:31 Darian3 Keepalived_vrrp[47257]: (Line 4) Unknown keyword 'router_id'
1月 20 20:12:31 Darian3 Keepalived_vrrp[47257]: (Line 5) Unknown keyword '}'
1月 20 20:12:31 Darian3 Keepalived_vrrp[47257]: Assigned address 192.168.40.129 for interface ens33
1月 20 20:12:31 Darian3 Keepalived_vrrp[47257]: Assigned address fe80::d3a1:60b3:dbb3:68c2 for interface ens33
1月 20 20:12:31 Darian3 Keepalived_vrrp[47257]: Registering gratuitous ARP shared channel
1月 20 20:12:31 Darian3 Keepalived_vrrp[47257]: (VI_1) removing VIPs.
1月 20 20:12:31 Darian3 Keepalived_vrrp[47257]: (VI_1) Entering BACKUP STATE (init)
1月 20 20:12:31 Darian3 Keepalived_vrrp[47257]: VRRP sockpool: [ifindex(2), proto(112), unicast(0), fd(8,9)]
1月 20 20:12:37 Darian3 Keepalived_healthcheckers[47256]: TCP connection to [192.168.40.129]:tcp:80 success.
[root@Darian3 software]#
[root@Darian1 software]# service keepalived restart
Restarting keepalived (via systemctl): [ 确定 ]
[root@Darian1 software]# service keepalived status
● keepalived.service - LVS and VRRP High Availability Monitor
Loaded: loaded (/usr/lib/systemd/system/keepalived.service; enabled; vendor preset: disabled)
Active: active (running) since 日 2019-01-20 20:10:22 CST; 20s ago
Process: 83210 ExecStart=/software/keepalived/sbin/keepalived $KEEPALIVED_OPTIONS (code=exited, status=0/SUCCESS)
Main PID: 83211 (keepalived)
CGroup: /system.slice/keepalived.service
├─83211 /software/keepalived/sbin/keepalived -D
├─83212 /software/keepalived/sbin/keepalived -D
└─83213 /software/keepalived/sbin/keepalived -D
1月 20 20:10:25 Darian1 Keepalived_vrrp[83213]: Sending gratuitous ARP on ens33 for 192.168.11.100
1月 20 20:10:25 Darian1 Keepalived_vrrp[83213]: Sending gratuitous ARP on ens33 for 192.168.11.100
1月 20 20:10:25 Darian1 Keepalived_vrrp[83213]: Sending gratuitous ARP on ens33 for 192.168.11.100
1月 20 20:10:28 Darian1 Keepalived_healthcheckers[83212]: TCP connection to [192.168.40.128]:udp:80 success.
1月 20 20:10:30 Darian1 Keepalived_vrrp[83213]: Sending gratuitous ARP on ens33 for 192.168.11.100
1月 20 20:10:30 Darian1 Keepalived_vrrp[83213]: (VI_1) Sending/queueing gratuitous ARPs on ens33 for 192.168.11.100
1月 20 20:10:30 Darian1 Keepalived_vrrp[83213]: Sending gratuitous ARP on ens33 for 192.168.11.100
1月 20 20:10:30 Darian1 Keepalived_vrrp[83213]: Sending gratuitous ARP on ens33 for 192.168.11.100
1月 20 20:10:30 Darian1 Keepalived_vrrp[83213]: Sending gratuitous ARP on ens33 for 192.168.11.100
1月 20 20:10:30 Darian1 Keepalived_vrrp[83213]: Sending gratuitous ARP on ens33 for 192.168.11.100
[root@Darian1 software]#
[root@Darian3 software]# service keepalived restart
Restarting keepalived (via systemctl): [ 确定 ]
[root@Darian3 software]# service keepalived status
● keepalived.service - LVS and VRRP High Availability Monitor
Loaded: loaded (/usr/lib/systemd/system/keepalived.service; enabled; vendor preset: disabled)
Active: active (running) since 日 2019-01-20 20:12:31 CST; 15s ago
Process: 47254 ExecStart=/software/keepalived/sbin/keepalived $KEEPALIVED_OPTIONS (code=exited, status=0/SUCCESS)
Main PID: 47255 (keepalived)
CGroup: /system.slice/keepalived.service
├─47255 /software/keepalived/sbin/keepalived -D
├─47256 /software/keepalived/sbin/keepalived -D
└─47257 /software/keepalived/sbin/keepalived -D
1月 20 20:12:31 Darian3 Keepalived_vrrp[47257]: (Line 3) Unexpected '{' - ignoring
1月 20 20:12:31 Darian3 Keepalived_vrrp[47257]: (Line 4) Unknown keyword 'router_id'
1月 20 20:12:31 Darian3 Keepalived_vrrp[47257]: (Line 5) Unknown keyword '}'
1月 20 20:12:31 Darian3 Keepalived_vrrp[47257]: Assigned address 192.168.40.129 for interface ens33
1月 20 20:12:31 Darian3 Keepalived_vrrp[47257]: Assigned address fe80::d3a1:60b3:dbb3:68c2 for interface ens33
1月 20 20:12:31 Darian3 Keepalived_vrrp[47257]: Registering gratuitous ARP shared channel
1月 20 20:12:31 Darian3 Keepalived_vrrp[47257]: (VI_1) removing VIPs.
1月 20 20:12:31 Darian3 Keepalived_vrrp[47257]: (VI_1) Entering BACKUP STATE (init)
1月 20 20:12:31 Darian3 Keepalived_vrrp[47257]: VRRP sockpool: [ifindex(2), proto(112), unicast(0), fd(8,9)]
1月 20 20:12:37 Darian3 Keepalived_healthcheckers[47256]: TCP connection to [192.168.40.129]:tcp:80 success.
[root@Darian3 software]#2
3
4
5
6
7
8
9
10
11
12
13
14
15
16
17
18
19
20
21
22
23
24
25
26
27
28
29
30
31
32
33
34
35
36
37
38
39
40
41
42
43
44
45
46
47
48
49
50
Nginx 是每秒都可以抗十万的。
踩坑:
配置同一个网段,不是同一个网段,访问会有问题!!!
线程在进程之内是共享的。共享资源相互影响。
线程产生的成本比进程低。
keepalived 日志文件配置
首先看一下
/etc/sysconfig/keepalived文件cvim /etc/sysconfig/keepalived KEEPALIVED_OPTIONS="-D -d -S 0"vim /etc/sysconfig/keepalived KEEPALIVED_OPTIONS="-D -d -S 0"1
2
3-D就是输出日志的选项这里的“-S 0”表示 local0.* 具体的还需要看一下/etc/syslog.conf 文件
在
/etc/rsyslog.conf里添加:local0.* /var/log/keepalived.logc[root@Darian3 keepalived]# vim /etc/rsyslog.conf[root@Darian3 keepalived]# vim /etc/rsyslog.conf1重新启动 keepalived 和 rsyslog 服务:
service rsyslog restartservice keepalived restartc[root@Darian1 keepalived]# vim /etc/sysconfig/keepalived [root@Darian1 keepalived]# vim /etc/rsyslog.conf # keepalived 的log local0.* /var/log/keepalived.log [root@Darian1 keepalived]# service rsyslog restart [root@Darian1 keepalived]# service keepalived restart[root@Darian1 keepalived]# vim /etc/sysconfig/keepalived [root@Darian1 keepalived]# vim /etc/rsyslog.conf # keepalived 的log local0.* /var/log/keepalived.log [root@Darian1 keepalived]# service rsyslog restart [root@Darian1 keepalived]# service keepalived restart1
2
3
4
5
6
7
8查看日志:
ctail -f /var/log/keepalived.logtail -f /var/log/keepalived.log1
通过脚本实现动态切换
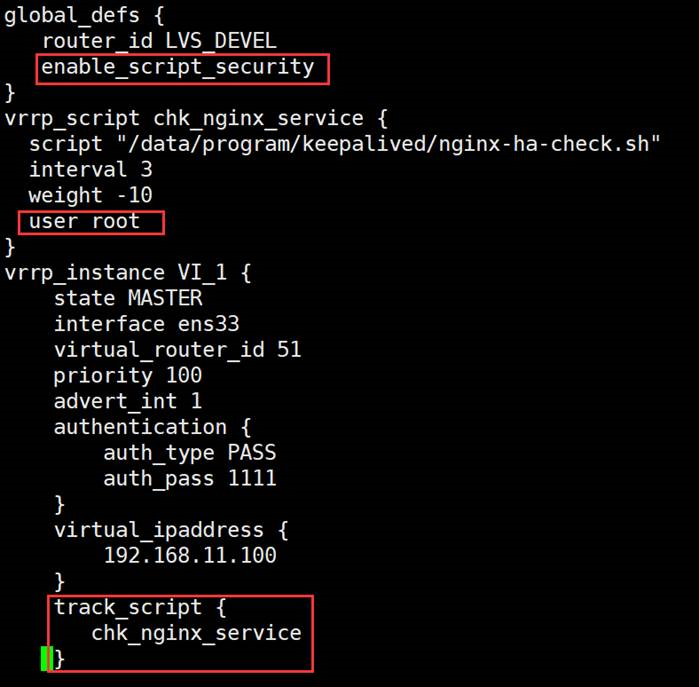
Keepalived 需要配置主备来实现动态的切换。Nginx 挂掉的时候,keepalived 也要停止掉。keepalived 的存在的意义是用来监听 Nginx 的请求。这个监听的过程实际上是通过 LVS 来转发的。需要脚本来触发。
在 master 和 slave 节点的
/data/program/nginx/sbin/nginx-ha-check.sh目录下增加一个脚本–no-headers 不打印头文件
Wc –l
统计行数
c[root@Darian1 keepalived]# cd ../nginx/sbin/ [root@Darian1 sbin]# vim nginx_status_check.sh[root@Darian1 keepalived]# cd ../nginx/sbin/ [root@Darian1 sbin]# vim nginx_status_check.sh1
2c#!bin/sh #! /bin/sh 是指此脚本使用/bin/sh 来执行 A=`ps -C nginx --no-header |wc -l` if [ $A -eq 0 ] then echo 'nginx server is died' service keepalived stop fi#!bin/sh #! /bin/sh 是指此脚本使用/bin/sh 来执行 A=`ps -C nginx --no-header |wc -l` if [ $A -eq 0 ] then echo 'nginx server is died' service keepalived stop fi1
2
3
4
5
6
7
8
9修改 keepalived.conf 文件,增加如下配置
track_script: #执行监控的服务。chknginxservice #
引用 VRRP 脚本,即在
vrrp_script部分指定的名字。定期运行它们来改变优先级, 并最终引发主备切换。当我们 Nginx 挂掉以后,会触发这个脚本。
操作步骤:
- 编写
keepalived.conf脚本c[root@Darian1 sbin]# vim /etc/keepalived/keepalived.conf global_defs { # 运行 keepalived 服务器的标识,在一个网络内应该是唯一的 router_id LVS_DEVEL enable_script_security } vrrp_script nginx_status_process { # 实现当 Nginx 挂掉以后,keepalived 也挂掉 script "/software/nginx/sbin/nginx_status_check.sh" # 用户的隔离,用户的运行权限,防止其它用户对这个脚本的执行 user root # 检查频次 interval 3 } # vrrp 实例定义部分 vrrp_instance VI_1 { # 设置 lvs 的状态,MASTER 和 BACKUP 两种,必须大写 state MASTER # 设置对外服务的接口,网卡的地址 interface ens33 # 设置虚拟路由标示,这个标示是一个数字,同一个 vr rp 实例使用唯一标示 virtual_router_id 51 # 定义优先级,数字越大优先级越高,在一个 vrrp——instance 下,master 的优先级必须大于 backup priority 100 # 设定 master 与 backup 负载均衡器之间同步检查的时间间隔,单位是秒 advert_int 1 authentication { # 设置验证类型和密码 auth_type PASS # 验证密码,同一个 vrrp_instance 下 MASTER 和 BACKUP 密码必须相同 auth_pass 1111 } virtual_ipaddress { #设置虚拟 ip 地址,可以设置多个,每行一个 192.168.40.100 } track_script{ # 对应的 上边的 nginx_status_process nginx_status_process } } # 设置虚拟服务器,需要指定虚拟 ip 和服务端口 virtual_server 192.168.40.100 80 { # 健康检查时间间隔 delay_loop 6 # 负载均衡调度算法 lb_algo rr # 负载均衡转发规则 lb_kind NAT # 设置会话保持时间protocol TCP #指定转发协议类型,有 TCP 和 UDP 两种 persistence_timeout 50 # 配置服务器节点 1,需要指定 real server 的真实 IP 地址和端口 real_server 192.168.40.128 80 { # 设置权重,数字越大权重越高 weight 1 # realserver 的状态监测设置部分单位秒,用来去检测它的状态 TCP_CHECK { # 超时时间 connect_timeout 3 # 重试间隔 delay_before_retry 3 # 监测端口 connect_port 80 } } }[root@Darian1 sbin]# vim /etc/keepalived/keepalived.conf global_defs { # 运行 keepalived 服务器的标识,在一个网络内应该是唯一的 router_id LVS_DEVEL enable_script_security } vrrp_script nginx_status_process { # 实现当 Nginx 挂掉以后,keepalived 也挂掉 script "/software/nginx/sbin/nginx_status_check.sh" # 用户的隔离,用户的运行权限,防止其它用户对这个脚本的执行 user root # 检查频次 interval 3 } # vrrp 实例定义部分 vrrp_instance VI_1 { # 设置 lvs 的状态,MASTER 和 BACKUP 两种,必须大写 state MASTER # 设置对外服务的接口,网卡的地址 interface ens33 # 设置虚拟路由标示,这个标示是一个数字,同一个 vr rp 实例使用唯一标示 virtual_router_id 51 # 定义优先级,数字越大优先级越高,在一个 vrrp——instance 下,master 的优先级必须大于 backup priority 100 # 设定 master 与 backup 负载均衡器之间同步检查的时间间隔,单位是秒 advert_int 1 authentication { # 设置验证类型和密码 auth_type PASS # 验证密码,同一个 vrrp_instance 下 MASTER 和 BACKUP 密码必须相同 auth_pass 1111 } virtual_ipaddress { #设置虚拟 ip 地址,可以设置多个,每行一个 192.168.40.100 } track_script{ # 对应的 上边的 nginx_status_process nginx_status_process } } # 设置虚拟服务器,需要指定虚拟 ip 和服务端口 virtual_server 192.168.40.100 80 { # 健康检查时间间隔 delay_loop 6 # 负载均衡调度算法 lb_algo rr # 负载均衡转发规则 lb_kind NAT # 设置会话保持时间protocol TCP #指定转发协议类型,有 TCP 和 UDP 两种 persistence_timeout 50 # 配置服务器节点 1,需要指定 real server 的真实 IP 地址和端口 real_server 192.168.40.128 80 { # 设置权重,数字越大权重越高 weight 1 # realserver 的状态监测设置部分单位秒,用来去检测它的状态 TCP_CHECK { # 超时时间 connect_timeout 3 # 重试间隔 delay_before_retry 3 # 监测端口 connect_port 80 } } }1
2
3
4
5
6
7
8
9
10
11
12
13
14
15
16
17
18
19
20
21
22
23
24
25
26
27
28
29
30
31
32
33
34
35
36
37
38
39
40
41
42
43
44
45
46
47
48
49
50
51
52
53
54
55
56
57
58
59
60
61
62
63
64
65
66
67
68
69
70
71
72
73
- 编写 脚本。Nginx/sbin
c[root@Darian1 sbin]# vim nginx-ha-check.sh #!bin/sh #! /bin/sh 是指此脚本使用/bin/sh 来执行 A=`ps -C nginx --no-header |wc -l` if [ $A -eq 0 ] then echo 'nginx server is died' service keepalived stop fi[root@Darian1 sbin]# vim nginx-ha-check.sh #!bin/sh #! /bin/sh 是指此脚本使用/bin/sh 来执行 A=`ps -C nginx --no-header |wc -l` if [ $A -eq 0 ] then echo 'nginx server is died' service keepalived stop fi1
2
3
4
5
6
7
8
9
10
11
- 测试脚本是否可用
c[root@Darian1 sbin]# sh nginx_status_check.sh nginx server is died Stopping keepalived (via systemctl): [ 确定 ][root@Darian1 sbin]# sh nginx_status_check.sh nginx server is died Stopping keepalived (via systemctl): [ 确定 ]1
2
3
- 添加生效
c[root@Darian1 sbin]# chmod +x nginx_status_check.sh [root@Darian1 sbin]# service keepalived restart [root@Darian1 sbin]# ./nginx -s stop[root@Darian1 sbin]# chmod +x nginx_status_check.sh [root@Darian1 sbin]# service keepalived restart [root@Darian1 sbin]# ./nginx -s stop1
2
3
4
美团的 Camel
OpenResty
Nginx + lua
OpenResty 是一个通过 Lua 扩展 Nginx 实现的可伸缩的 Web 平台,内部集成了大量精良的 Lua 库、第三方模块以及大多数的依赖项。用于方便地搭建能够处理超高并发、扩展性极高的动态 Web 应用、Web 服务和动态网关。
安装
下载安装包
https://openresty.org/cn/download.html
- sh
weget https://openresty.org/download/openresty-1.13.6.2.tar.gzweget https://openresty.org/download/openresty-1.13.6.2.tar.gz1
安装软件包
c[root@Darian1 software]# tar -zxvf openresty-1.13.6.2.tar.gz cd openrestry-1.13.6.2 [root@Darian1 software]# mkdir openresty [root@Darian1 software]# cd openresty-1.13.6.2/ [root@Darian1 software]# mkdir openresty [root@Darian1 openresty-1.13.6.2]# ./configure --prefix=/software/openresty [root@Darian1 openresty-1.13.6.2]# make && make install[root@Darian1 software]# tar -zxvf openresty-1.13.6.2.tar.gz cd openrestry-1.13.6.2 [root@Darian1 software]# mkdir openresty [root@Darian1 software]# cd openresty-1.13.6.2/ [root@Darian1 software]# mkdir openresty [root@Darian1 openresty-1.13.6.2]# ./configure --prefix=/software/openresty [root@Darian1 openresty-1.13.6.2]# make && make install1
2
3
4
5
6c./configure [默认会安装在/usr/local/openresty 目录] --prefix= 指定路径 make && make install./configure [默认会安装在/usr/local/openresty 目录] --prefix= 指定路径 make && make install1
2可能存在的错误,第三方依赖库没有安装的情况下会报错
cyum install readline-devel / pcre-devel /openssl-develyum install readline-devel / pcre-devel /openssl-devel1安装过程和 Nginx 是一样的,因为他是基于 Nginx 做的扩展
HelloWorld
开始第一个程序,HelloWorld
openresty/nginx/conf/nginx.conf 就是 nginx 的配置的东西。
[root@Darian3 software]# cd openresty/nginx/
[root@Darian3 nginx]# vim conf/nginx.conf


location / {
	default_type         text/html;
	content_by_lua_block {
	    ngx.say("helloworld");
    }
}

[root@Darian3 nginx]# ./sbin/nginx
[root@Darian3 software]# cd openresty/nginx/
[root@Darian3 nginx]# vim conf/nginx.conf
location / {
default_type text/html;
content_by_lua_block {
ngx.say("helloworld");
}
}
[root@Darian3 nginx]# ./sbin/nginx2
3
4
5
6
7
8
9
10
11
12
在 sbin 目录下执行.nginx 命令就可以运行,看到 helloworld

建立工作空间
创建目录
或者为了不影响默认的安装目录,我们可以创建一个独立的空间来练习,先到在安装目录下创建 demo 目录,安装目录为 /data/program/openresty/demo
mkdir demo
然后在 demo 目录下创建两个子目录,一个是 logs 、一个是 conf
创建配置文件
执行:./nginx -p /data/program/openresty/demo 【-p 主要是指明 nginx 启动时的配置目录】
c[root@Darian1 openresty]# mkdir demo [root@Darian1 openresty]# cd demo/ [root@Darian1 demo]# mkdir conf [root@Darian1 demo]# mkdir logs [root@Darian1 demo]# cd conf/ [root@Darian1 conf]# vim nginx.conf worker_processes 1; error_log logs/error.log; events { worker_connections 1024; } http { server { listen 8888; location / { default_type text/html; content_by_lua_block { ngx.say("Hello world") } } } } [root@Darian1 conf]# cd ../../nginx/sbin/ [root@Darian1 sbin]# ./nginx -p /software/openresty/demo/[root@Darian1 openresty]# mkdir demo [root@Darian1 openresty]# cd demo/ [root@Darian1 demo]# mkdir conf [root@Darian1 demo]# mkdir logs [root@Darian1 demo]# cd conf/ [root@Darian1 conf]# vim nginx.conf worker_processes 1; error_log logs/error.log; events { worker_connections 1024; } http { server { listen 8888; location / { default_type text/html; content_by_lua_block { ngx.say("Hello world") } } } } [root@Darian1 conf]# cd ../../nginx/sbin/ [root@Darian1 sbin]# ./nginx -p /software/openresty/demo/1
2
3
4
5
6
7
8
9
10
11
12
13
14
15
16
17
18
19
20
21
22
23
24
25
26


总结
我们刚刚通过一个 helloworld 的简单案例来演示了 nginx + lua 的功能,其中用到了 ngx.say 这个表达式,通过在 content_by_lua_block 这个片段中进行访问;这个表达式属于 ngx_lua 模块提供的 api, 用于向客户端输出一个内容。
我们配置了多个 模块,就会有固定的顺序。
写一个完全做认证的模块
c[root@Darian1 openresty]# cd demo/conf/ [root@Darian1 conf]# mkdir lua [root@Darian1 conf]# cd lua [root@Darian1 lua]# vim add.lua local args = ngx.req.get_uri_args(); ngx.say(args.a + args.b); [root@Darian1 lua]# vim params.lua local _M = {} function _M.is_number(...) local arg = {...} local num; for i,v in ipairs(arg) do num=tonumber(v); if nil == num then return false; end end return true; end return _M; [root@Darian1 lua]# vim check.lua local param=require("params"); local args=ngx.req.get_uri_args(); if not args.a or not args.b or not param.is_number(args.a, args.b) then ngx.exit(ngx.HTTP_BAD_REQUEST); return; end [root@Darian1 lua]# vim ../nginx.conf worker_processes 1; error_log logs/error.log; events { worker_connections 1024; } http { lua_package_path '$prefix/lua/?.lua'; lua_code_cache off; server { listen 80; location ~ ^/api/([-_a-zA-Z0_9]+) { access_by_lua_file lua/check.lua; content_by_lua_file lua/$1.lua; } } } [root@Darian1 lua]# cd ../../../nginx/sbin/ [root@Darian1 sbin]# history [root@Darian1 sbin]# ./nginx -p /software/openresty/demo/ nginx: [alert] lua_code_cache is off; this will hurt performance in /software/openresty/demo/conf/nginx.conf:11[root@Darian1 openresty]# cd demo/conf/ [root@Darian1 conf]# mkdir lua [root@Darian1 conf]# cd lua [root@Darian1 lua]# vim add.lua local args = ngx.req.get_uri_args(); ngx.say(args.a + args.b); [root@Darian1 lua]# vim params.lua local _M = {} function _M.is_number(...) local arg = {...} local num; for i,v in ipairs(arg) do num=tonumber(v); if nil == num then return false; end end return true; end return _M; [root@Darian1 lua]# vim check.lua local param=require("params"); local args=ngx.req.get_uri_args(); if not args.a or not args.b or not param.is_number(args.a, args.b) then ngx.exit(ngx.HTTP_BAD_REQUEST); return; end [root@Darian1 lua]# vim ../nginx.conf worker_processes 1; error_log logs/error.log; events { worker_connections 1024; } http { lua_package_path '$prefix/lua/?.lua'; lua_code_cache off; server { listen 80; location ~ ^/api/([-_a-zA-Z0_9]+) { access_by_lua_file lua/check.lua; content_by_lua_file lua/$1.lua; } } } [root@Darian1 lua]# cd ../../../nginx/sbin/ [root@Darian1 sbin]# history [root@Darian1 sbin]# ./nginx -p /software/openresty/demo/ nginx: [alert] lua_code_cache is off; this will hurt performance in /software/openresty/demo/conf/nginx.conf:111
2
3
4
5
6
7
8
9
10
11
12
13
14
15
16
17
18
19
20
21
22
23
24
25
26
27
28
29
30
31
32
33
34
35
36
37
38
39
40
41
42
43
44
45
46
47
48
49
50
51
52
53
54
55
56
57
58
59
60 在 lua 里边有模块的概念,有包的概念。我可以把公共的代码放到一个文件里边。以 API 的方式去提供。可以把他作为一个方法。
正常的来说,我们会有一个 lua 文件夹,按照我们的需求去写。
我可以利用 lua 写一些复杂的逻辑。可以写业务代码的。
注意:
lua 目录在 demo 目录下
openresty/demo/lua/sub.lua
- JS 、 shell 都叫做脚本语言。
- history 查看命令的历史。
库文件使用
通过上面的案例,我们基本上对 OpenResty 有了一个更深的认识,其中我们用到了自定义的 lua 模块。实际上 openresty 提供了很丰富的模块。让我们在实现某些场景的时候更加方便。可以在 /openresty/lualib 目录下看到;比如在 resty 目录下可以看到 redis.lua、mysql.lua 这样的操作 redis 和操作数据库的模块。
使用 redis 模块连接 redis
worker_processes 1;
error_log
logs/error.log; events {
    worker_connections 1024;
}

http {
    lua_package_path '$prefix/lualib/?.lua;;'; # 添加”;;”表示默认路径下的lualib
    lua_package_cpath '$prefix/lualib/?.so;;';

server {
    location /demo {
        content_by_lua_block {
            local redisModule=require "resty.redis";
            local redis=redisModule:new();   # lua 的对象实例
            redis:set_timeout(1000);
            ngx.say("===begin connect redis server");
            local ok,err = redis:connect("127.0.0.1",6379);   #连接 redis
            if not ok then
                ngx.say("==connection redis failed,error message:",err);
            end
                ngx.say("==begin set key and value");
                ok,err=redis:set("hello","world");
            if not ok then
                ngx.say("set value failed");
                return;
            end
                ngx.say("===set value result:",ok);
                redis:close();
            }
        }
    }
}
worker_processes 1;
error_log
logs/error.log; events {
worker_connections 1024;
}
http {
lua_package_path '$prefix/lualib/?.lua;;'; # 添加”;;”表示默认路径下的lualib
lua_package_cpath '$prefix/lualib/?.so;;';
server {
location /demo {
content_by_lua_block {
local redisModule=require "resty.redis";
local redis=redisModule:new(); # lua 的对象实例
redis:set_timeout(1000);
ngx.say("===begin connect redis server");
local ok,err = redis:connect("127.0.0.1",6379); #连接 redis
if not ok then
ngx.say("==connection redis failed,error message:",err);
end
ngx.say("==begin set key and value");
ok,err=redis:set("hello","world");
if not ok then
ngx.say("set value failed");
return;
end
ngx.say("===set value result:",ok);
redis:close();
}
}
}
}2
3
4
5
6
7
8
9
10
11
12
13
14
15
16
17
18
19
20
21
22
23
24
25
26
27
28
29
30
31
32
33
演示效果
到 nginx 路径下执行 ./nginx -p /data/program/openresty/redisdemo 在浏览器中输入:http://192.168.11.160/demo 即可看到输出内容并且连接到 redis 服务器上以后,可以看到 redis 上的结果
redis 的所有命令操作,在 lua 中都有提供相应的操作 .比如 redis:get(“key”)、
redis:set()等
网关
通过扩展以后的,在实际过程中应该怎么去应用呢?一般的使用场景: 网关、web 防火墙、缓存服务器(对响应内容进行缓存,减少到达后端的请求,来提升性能),接下来重点讲讲网关的概念以及如何通过 Openresty 实现网关开发。
网关的概念
从一个房间到另一个房间,必须必须要经过一扇门,同样,从一个网络向另一个网络发送信息,必须经过一道“关口”,这道关口就是网关。顾名思义,网关(Gateway) 就是一个网络连接到另一个网络的“关口”。
那什么是 API 网关呢?
在微服务流行起来之前,api 网关就一直存在,最主要的应用场景就是开放平台, 也就是 open api; 这种场景大家接触的一定比较多,比如阿里的开放平台;当微服务流行起来以后,api 网关就成了上层应用集成的标配组件。
比如说,支付包地址会有一个网关,做一个统一的转发。
为什么需要网关?
- Kong 、Orange 、
对微服务组件地址进行统一抽象
API 网关意味着你要把 API 网关放到你的微服务的最前端,并且要让 API 网关变成由应用所发起的每个请求的入口。这样就可以简化客户端实现和微服务应用程序之间的沟通方式。
Backends for frontends

当服务越来越多以后,我们需要考虑一个问题,就是对某些服务进行安全校验以及用户身份校验。甚至包括对流量进行控制。 我们会对需要做流控、需要做身份认证的服务单独提供认证功能,但是服务越来越多以后,会发现很多组件的校验是重复的。这些东西很明显不是每个微服务组件需要去关心的事情。微服务组件只需要负责接收请求以及返回响应即可。可以把身份认证、流控都放在 API 网关层进行控制。
针对于 app 或者 web 等做不同的网关。不同的客户端不同的验证等不同的方式。
- 按照服务组件进行统一的抽象
- 针对不同的客户端来实现不同的 API 网关
网关的作用
- 鉴权
- 限流
- 灰度发布
- 分流
- 日志记录
OpenResty 实现 API 网关限流及登录授权
OpenResty 为什么能做网关?
前面我们了解到了网关的作用,通过网关,可以对 api 访问的前置操作进行统一的管理,比如鉴权、限流、负载均衡、日志收集、请求分片等。所以 API 网关的核心是所有客户端对接后端服务之前,都需要统一接入网关,通过网关层将所有非业务功能进行处理。
OpenResty 为什么能实现网关呢? OpenResty 有一个非常重要的因素是,对于每一个请求,Openresty 会把请求分为不同阶段,从而可以让第三方模块通过挂载行为来实现不同阶段的自定义行为。而这样的机制能够让我们非常方便的设计 api 网关。
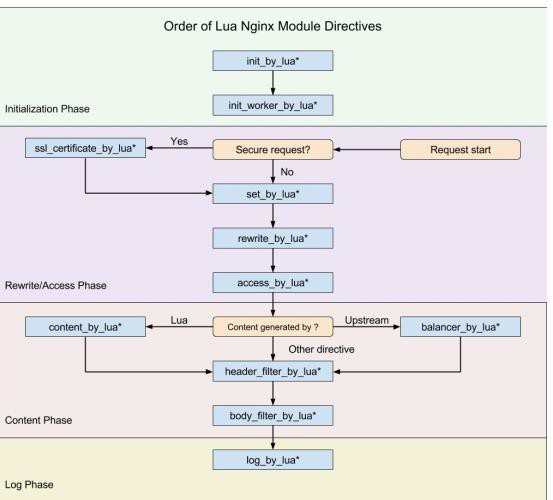
Nginx 本身在处理一个用户请求时,会按照不同的阶段进行处理,总共会分为 11 个阶段。而 openresty 的执行指令,就是在这 11 个步骤中挂载 lua 执行脚本实现扩展,我们分别看看每个指令的作用
initbylua : 当 Nginx master 进程加载 nginx 配置文件时会运行这段 lua 脚本,一般用来注册全局变量或者预加载 lua 模块
initwokerby_lua: 每个 Nginx worker 进程启动时会执行的 lua 脚本,可以用来做健康检查
setbylua:设置一个变量
rewritebylua:在 rewrite 阶段执行,为每个请求执行指定的 lua 脚本
accessbylua:为每个请求在访问阶段调用 lua 脚本
contentbylua:前面演示过,通过 lua 脚本生成 content 输出给 http 响应
balancerbylua:实现动态负载均衡,如果不是走 contentbylua,则走 proxy_pass,再通过 upstream 进行转发
headerfilterby_lua: 通过 lua 来设置 headers 或者 cookie
bodyfilterby_lua:对响应数据进行过滤
logbylua : 在 log 阶段执行的脚本,一般用来做数据统计,将请求数据传输到后端进行分析
zuul 的 filter 也是类似的实现。
灰度发布
在单一架构中,随着代码量和业务量不断扩大,版本迭代会逐步变成一个很困难的事情,哪怕是一点小的修改,都必须要对整个应用重新部署。 但是在微服务中, 各个模块是是一个独立运行的组件,版本迭代会很方便,影响面很小。
同时,为服务化的组件节点,对于我们去实现灰度发布(金丝雀发布:将一部分流量引导到新的版本)来说,也会变的很简单;
还可以有白名单,比如说 QQ 的升级改造计划,针对你升级。
所以通过 API 网关,可以对指定调用的微服务版本,通过版本来隔离。如下图所示
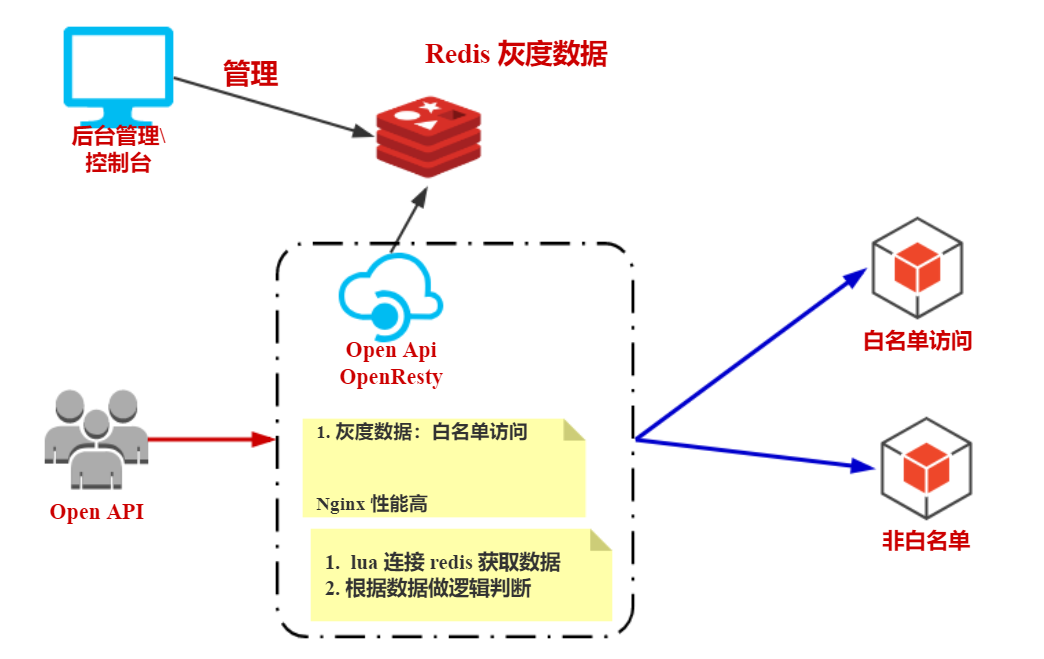
灰度发布的实现
文件件目录,
/data/program/openresty/gray [conf、logs、lua]编写 Nginx 的配置文件
nginx.conf
   [root@Darian1 openresty]# mkdir gray
   [root@Darian1 openresty]# cd gray
   [root@Darian1 gray]# mkdir lua
   [root@Darian1 gray]# mkdir logs
   [root@Darian1 gray]# mkdir conf
   [root@Darian1 gray]# cd conf/

   worker_processes 1;
   error_log      logs/error.log;

   events{
       worker_connections 1024;
   }
   http{
       lua_package_path "$prefix/lualib/?.lua;;";
       lua_package_cpath "$prefix/lualib/?.so;;";
       upstream prod {
           server 192.168.40.128:8080;
       }
       upstream pre {
           server 192.168.40.129:8080;
       }
       server {
           listen  80;
           server_name localhost;
           location /api {
               content_by_lua_file lua/gray.lua;
           }
           location @prod {
               proxy_pass http://prod;
           }
           location @pre {
               proxy_pass http://pre;
           }
       }
   }


   [root@Darian1 conf]# cd ../lua/
   [root@Darian1 lua]# vim gray.lua
   [root@Darian1 openresty]# mkdir gray
   [root@Darian1 openresty]# cd gray
   [root@Darian1 gray]# mkdir lua
   [root@Darian1 gray]# mkdir logs
   [root@Darian1 gray]# mkdir conf
   [root@Darian1 gray]# cd conf/

   worker_processes 1;
   error_log      logs/error.log;

   events{
       worker_connections 1024;
   }
   http{
       lua_package_path "$prefix/lualib/?.lua;;";
       lua_package_cpath "$prefix/lualib/?.so;;";
       upstream prod {
           server 192.168.40.128:8080;
       }
       upstream pre {
           server 192.168.40.129:8080;
       }
       server {
           listen  80;
           server_name localhost;
           location /api {
               content_by_lua_file lua/gray.lua;
           }
           location @prod {
               proxy_pass http://prod;
           }
           location @pre {
               proxy_pass http://pre;
           }
       }
   }


   [root@Darian1 conf]# cd ../lua/
[root@Darian1 lua]# vim gray.lua2
3
4
5
6
7
8
9
10
11
12
13
14
15
16
17
18
19
20
21
22
23
24
25
26
27
28
29
30
31
32
33
34
35
36
37
38
39
40
41
- 编写 gray.lua 文件
   local redis=require "resty.redis";
   local red=redis:new();
   red:set_timeout(1000);

   local ok,err=red:connect("192.168.40.128",6379);

   if not ok then
       ngx.say("failed to connect redis",err);
       return;
   end

   local headers=ngx.req.get_headers()
   local local_ip=headers["X-REAL-IP"] or headers["X_FORWARDED_FOR"] or ngx.var.remote_addr

   local ip_lists=red:get("gray");
   if ip_lists ~= nil and  string.find(ip_lists,local_ip) == nil then
       ngx.exec("@prod");
   else
       ngx.exec("@pre");
   end
       local ok,err=red:close();
   local redis=require "resty.redis";
   local red=redis:new();
   red:set_timeout(1000);

   local ok,err=red:connect("192.168.40.128",6379);

   if not ok then
       ngx.say("failed to connect redis",err);
       return;
   end

   local headers=ngx.req.get_headers()
   local local_ip=headers["X-REAL-IP"] or headers["X_FORWARDED_FOR"] or ngx.var.remote_addr

   local ip_lists=red:get("gray");
   if ip_lists ~= nil and  string.find(ip_lists,local_ip) == nil then
       ngx.exec("@prod");
   else
       ngx.exec("@pre");
   end
local ok,err=red:close();2
3
4
5
6
7
8
9
10
11
12
13
14
15
16
17
18
19
20
21
22
执行命令启动 nginx: [./nginx -p /data/program/openresty/gray]
启动 redis,并设置 set gray 192.168.11.160
通过浏览器运行: http://192.168.11.160/api 查看运行结果
修改 redis gray 的值, 讲客户端的 ip 存储到 redis 中 set gray 1. 再次运行结果, 即可看到访问结果已经发生了变化
[root@Darian1 sbin]# ./nginx  -p ../../gray

[root@Darian1 bin]# ./redis-server ../../redis-3.2.8/redis.conf
[root@Darian1 bin]# ./redis-cli
127.0.0.1:6379> set gray 192.168.23.66
OK
127.0.0.1:6379> set gray 192.168.40.1
OK
[root@Darian1 sbin]# ./nginx -p ../../gray
[root@Darian1 bin]# ./redis-server ../../redis-3.2.8/redis.conf
[root@Darian1 bin]# ./redis-cli
127.0.0.1:6379> set gray 192.168.23.66
OK
127.0.0.1:6379> set gray 192.168.40.1
OK2
3
4
5
6
7
8
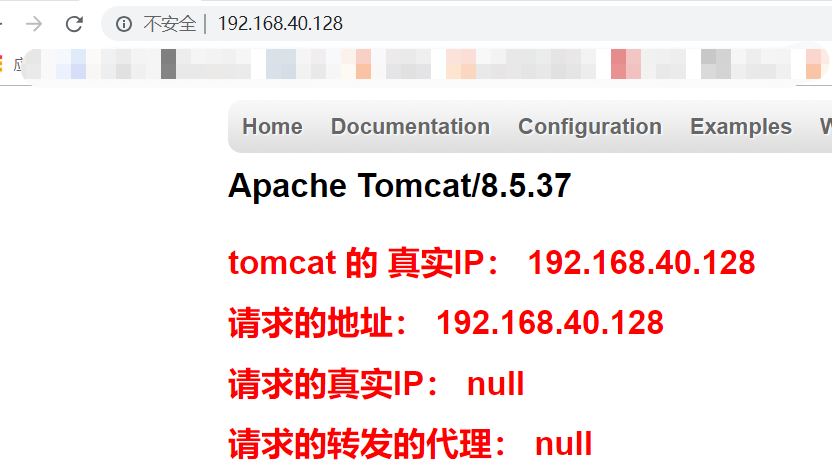
高可用踩坑:
记得网卡配置正确。

OpenResty/Demo/conf/nginx.conf 的配置文件
worker_processes 1;
error_log logs/error.log;
events {
    worker_connections 1024;
}
http {
    server {
        listen 8888;
        location / {
            default_type text/html;
            content_by_lua_block {
                local args = ngx.req.get_uri_args();
                ngx.say("Hello world");
            }
        }
        location /sub {
            content_by_lua_block{
                local args = ngx.req.get_uri_args();
                ngx.say(args.a-args.b);
            }
        }
    }
}
worker_processes 1;
error_log logs/error.log;
events {
worker_connections 1024;
}
http {
server {
listen 8888;
location / {
default_type text/html;
content_by_lua_block {
local args = ngx.req.get_uri_args();
ngx.say("Hello world");
}
}
location /sub {
content_by_lua_block{
local args = ngx.req.get_uri_args();
ngx.say(args.a-args.b);
}
}
}
}2
3
4
5
6
7
8
9
10
11
12
13
14
15
16
17
18
19
20
21
22
23
worker_processes 1;
error_log      logs/error.log;

events{
    worker_connections 1024;
}
http{
    # 两个分号,表示默认路径下
    lua_package_path "$prefix/lualib/?.lua;;";
    lua_package_cpath "$prefix/lualib/?.so;;";
    upstream prod {
        server 192.168.11.156:8080;
    }
    upstream pre {
        server 192.168.11.156:8081;
    }
    server {
        listen  80;
        server_name localhost;
        location /api {
            content_by_lua_file lua/gray.lua;
        }
        location @prod {
            proxy_pass http://prod;
        }
        location @pre {
            proxy_pass http://pre;
        }
    }
    server {
        listen 8080;
        location / {
            content_by_lua_block {
                ngx.say("I'm prod env");
            }
        }
    }
    server {
        listen 8081;
        location / {
            content_by_lua_block {
                ngx.say("I'm pre env");
            }
        }
    }
}
worker_processes 1;
error_log logs/error.log;
events{
worker_connections 1024;
}
http{
# 两个分号,表示默认路径下
lua_package_path "$prefix/lualib/?.lua;;";
lua_package_cpath "$prefix/lualib/?.so;;";
upstream prod {
server 192.168.11.156:8080;
}
upstream pre {
server 192.168.11.156:8081;
}
server {
listen 80;
server_name localhost;
location /api {
content_by_lua_file lua/gray.lua;
}
location @prod {
proxy_pass http://prod;
}
location @pre {
proxy_pass http://pre;
}
}
server {
listen 8080;
location / {
content_by_lua_block {
ngx.say("I'm prod env");
}
}
}
server {
listen 8081;
location / {
content_by_lua_block {
ngx.say("I'm pre env");
}
}
}
}2
3
4
5
6
7
8
9
10
11
12
13
14
15
16
17
18
19
20
21
22
23
24
25
26
27
28
29
30
31
32
33
34
35
36
37
38
39
40
41
42
43
44
45
46


